定时回调的实现 CustomYieldInstruction 文档 如果想要在协程函数里面自定义 yield return new xxxxClass(); 那么就需要继承自 CustomYieldInstruction,然后重写里面的 keepWaiting 属性,为 false 的时候表示继续运行,true 的时候表示继续挂起(等待),每一帧都会在 MonoBehaviour.Update 之后,MonoBehaviour.LateUpdate 之前检查一遍 keepWaiting 的值,并确定要不要运行。
下面的例子运行效果是:先点击 “开始等待按下鼠标右键” 的按钮,此时输出 start waitting mouse button down,然后当前线程会继续运行,所以会输出 wait-mouse-button-down coroutine has started, 而 “等待右键按下的协程” 此时在等待右键按下。当右键按下后协程函数会继续运行,所以会输出 right button pressed。
代码和运行结果如下:
1 2 3 4 5 6 7 8 9 10 11 12 13 14 15 16 17 18 19 20 21 22 23 24 25 26 27 28 29 30 31 32 33 34 35 36 37 38 using System.Collections;using System.Collections.Generic;using UnityEngine;public class CustomYieldInstructionTest : MonoBehaviour { private void OnGUI ( if (GUILayout.Button("开始等待按下鼠标右键" )) { StartCoroutine(WaitMouseButtonDown()); Debug.Log("wait-mouse-button-down coroutine has started" ); } } private IEnumerator WaitMouseButtonDown ( yield return new WaitForMouseDown ( Debug.Log("right button pressed" ); } } public class WaitForMouseDown : CustomYieldInstruction { public override bool keepWaiting { get { return !Input.GetMouseButtonDown(1 ); } } public WaitForMouseDown ( Debug.Log("start waitting mouse button down" ); } }
start waitting mouse button down
wait-mouse-button-down coroutine has started
right button pressed
实现 1 2 3 4 5 6 7 8 9 10 11 12 13 14 15 16 17 18 19 20 21 22 23 24 25 26 27 28 29 30 31 32 33 34 35 36 37 38 39 40 41 42 43 44 45 46 47 48 49 50 51 52 53 54 using System.Collections;using System.Collections.Generic;using UnityEngine;using UnityEngine.Events;public class Script_04_19 : MonoBehaviour { IEnumerator Start ( Debug.LogFormat("10s start,now time:{0}" , Time.time); yield return new CustomWait (10 , 1 , ("now time: {0}" , Time.time); }); Debug.LogFormat("10s over,now time:{0}" , Time.time); } public class CustomWait : CustomYieldInstruction { public override bool keepWaiting { get { if (Time.time - m_StartTime >= m_TotalTime) { return false ; } else { if (Time.time - m_LastTime >= m_Interval) { m_LastTime = Time.time; callback(); } } return true ; } } private float m_TotalTime; private float m_Interval; private float m_StartTime; private float m_LastTime; private UnityAction callback; public CustomWait (float totalTime,float interval,UnityAction callback this .m_TotalTime = totalTime; this .m_Interval = interval; this .m_StartTime = Time.time; this .m_LastTime = Time.time; this .callback = callback; } } }
直接点击运行,结果为:
10s start,now time:0
now time: 1.003115
now time: 2.007475
now time: 3.010088
now time: 4.011698
now time: 5.013549
now time: 6.015391
now time: 7.01544
now time: 8.018571
now time: 9.019051
10s over,now time:10.00058
可以看到基本上是实现了的,但是我认为还是存在三个问题:
无法设置非常小的时间间隔。假设游戏是以 30FPS 稳定运行,那么就不能通过这种方法完成每 0.03s 回调一次的功能,因为帧与帧之间是 0.02s。
掉帧或者运行不稳定的话,不能每次时间间隔相等。其实从上面也可以看出来每次的时间间隔也是有细微差别的,如果一帧运算量过大导致掉帧,那这种差别就更大了。
因为每一次离预期的时间间隔都会有细小的差别,以后每次回调的时间都是在上一次上再计算,就会导致差距越来越大。我试验到 1000s ,最后的结果为:
now time: 999.7771
1000s over,now time:1000.004
可以看到,现在已经到了 999.777,那我有理由相信 2000s 的时候,就会有 1s 以上的差值。
改动一:将内部类提出来了,可行。
将 Start 的返回值变成了 IEnumerator 之后,就不能有 void Start 了。
工作线程 想要运行多线程的任务,一种方法是在主线程创建新的线程,然后运行结束之后将结果与主线程同步,但这样适用于少量的,长期运作的线程,但游戏经常会创建大量的小体量的线程,这样的话每个线程的生命周期都很短,可能会成为 CPU 和操作系统的瓶颈。另一种方法是使用线程池,但如果同时有大量的活动线程,超过了 CPU 的物理核心数的话,就会导致线程之间的竞争,从而产生频繁的上下文切换。而 Job System 基本上保证一个 Work Thread 对应一个逻辑核心,以减少上下文的切换,Job System 会将 Job 放到一个工作队列,然后顺序的执行,每个 Job 之间可以是独立的,也可以是依赖的,Job System 会保证执行的顺序和依赖关系。Unity 官网 上举了一个例子,如果主线程将一个引用传递给工作线程,那工作线程是不知道自己在改变这个值的时候,主线程是否在读取的,为了避免这种情况的发生,Unity 采用的策略是,在线程之间不传递引用,只传递拷贝,这样的话就需要保证可传递的数据类型都是 blittable data types 的,这样在托管内存和非托管内存中移动时不需要转化(这里暂时不是很懂),具体的类型为:
System.Byte
System.SByte
System.Int16
System.UInt16
System.Int32
System.UInt32
System.Int64
System.UInt64
System.IntPtr
System.UIntPtr
System.Single
System.Double
这样的显而易见的问题就是,会出现多份拷贝,并且在各个线程中不统一的情况。为了解决这个问题,再引出一个 NativeContainer,他其实是主线程开启的一块共享内存,工作线程可以直接操作这块内存中的数据,从而避免拷贝,这种数据的类型为 NativeArray ,他可以保证多个线程在写入相同的共享内存时,会抛出异常,这时可以考虑将两者或者多者在共享内存的使用上设置为依赖关系。默认情况下,一个 job 对 NativeArray 有权限时,意味着它拥有读和写权限。如果只需要读的话,可以在加上 [ReadOnly], 两个同时只具有读权限的 Job 可以同时读取一块共享内存。使用方法如下:
1 2 [ReadOnly ] public NativeArray<int > input;
注意:static 数据会绕过所有的安全系统。NativeArray 的时候,应该指定内存分配器的类型,有以下三种类型:
Allocator.Temp 具有最快的分配速度。此类型适用于寿命为一帧或更短的分配。不应该使用 Temp 将 NativeContainer 分配传递给作业。在从方法调用(例如 MonoBehaviour.Update 或从本机代码到托管代码的任何其他回调)返回之前,还需要调用 Dispose 方法。Allocator.TempJob 的分配速度比 Temp 慢,但比 Persistent 快。此类型适用于寿命为四帧的分配,并具有线程安全性。如果没有在四帧内对其执行 Dispose 方法,控制台会输出一条从本机代码生成的警告。大多数小作业都使用这种 NativeContainer 分配类型。Allocator.Persistent 是最慢的分配,但可以在您所需的任意时间内持续存在,如果有必要,可以在整个应用程序的生命周期内存在。此分配器是直接调用 malloc 的封装器。持续时间较长的作业可以使用这种 NativeContainer 分配类型。在非常注重性能的情况下不应使用 Persistent
用法 创建如下作业,注意类内的成员变量只能为 blittable type 或者 NativeContainer type 之一,blittable type 的成员变量是拷贝,所以主线程想要访问工作线程的数据的话,只能通过 NativeContainer type。
1 2 3 4 5 6 7 8 9 10 11 12 public struct MyJob : IJob{ public float a; public float b; public NativeArray<float > result; public void Execute ( result[0 ] = a + b; } }
调用 Schedule 会将作业放到作业队列中,并且作业一旦已经被调度(这里应该就是指进入了作业队列的意思吧),那么就无法终止。以下代码在主线程中:
1 2 3 4 5 6 7 8 9 10 11 12 13 14 15 16 17 18 19 20 NativeArray<float > result = new NativeArray<float >(1 , Allocator.TempJob); MyJob jobData = new MyJob(); jobData.a = 10 ; jobData.b = 10 ; jobData.result = result; JobHandle handle = jobData.Schedule(); handle.Complete(); float aPlusB = result[0 ];result.Dispose();
如果存在依赖的话,可以在调用 Schedule 方法时,将需要依赖的另一个 JobHandle 传入:
1
2
JobHandle firstJobHandle = firstJob.Schedule(); secondJob.Schedule(firstJobHandle);
如果不止一个依赖的话,可以使用 JobHandle.CombineDependencies 进行整合:
1
2
3
4
5
NativeArray<JobHandle> handles = new NativeArray<JobHandle>(numJobs, Allocator.TempJob); JobHandle jh = JobHandle.CombineDependencies(handles);
执行了 Schedule 只是将 Job 加入了作业队列,如果在主线程中需要结果的话,可以调用 Complete 方法,它将先执行调用者及其依赖项的任务,并将该作业的 NativeContainer 类型的所有权交还给主线程。
1 2 3 4 5 6 7 8 9 10 11 12 13 14 15 16 17 18 19 20 21 22 23 24 public struct MyJob : IJob{ public float a; public float b; public NativeArray<float > result; public void Execute ( result[0 ] = a + b; } } public struct AddOneJob : IJob{ public NativeArray<float > result; public void Execute ( result[0 ] = result[0 ] + 1 ; } }
1 2 3 4 5 6 7 8 9 10 11 12 13 14 15 16 17 18 19 20 21 22 23 24 25 26 27 28 NativeArray<float > result = new NativeArray<float >(1 , Allocator.TempJob); MyJob jobData = new MyJob(); jobData.a = 10 ; jobData.b = 10 ; jobData.result = result; JobHandle firstHandle = jobData.Schedule(); AddOneJob incJobData = new AddOneJob(); incJobData.result = result; JobHandle secondHandle = incJobData.Schedule(firstHandle); secondHandle.Complete(); float aPlusB = result[0 ];result.Dispose();
如果我们希望大量的对象执行相同的操作,那么可以使用 ParallelFor Job,结构体实现 IJobParallelFor 接口,就是 ParallelFor Job,它使用一个数据 NativeArray 作为其数据源。并对数据源中的每一项都调用一次 Execute 方法。Execute 方法中有一个整数参数。该索引用于访问和操作作业实现中的数据源的单个元素。下面的例子中出现了三个 NativeArray ,但唯一的那个数据源其实是传递了长度的 NativeArray,他决定了调用几次 Execute。ParallelFor Job 运行在多个核上,彼此独立,可以同时操作多个 Execute。
1 2 3 4 5 6 7 8 9 10 11 12 13 14 15 public struct MyParallelJob : IJobParallelFor{ [ReadOnly ] public NativeArray<float > a; [ReadOnly ] public NativeArray<float > b; public NativeArray<float > result; public void Execute (int i result[i] = a[i] + b[i]; } }
1 2 3 4 5 6 7 8 9 10 11 12 13 14 15 16 17 18 19 20 21 22 23 24 25 26 27 NativeArray<float > a = new NativeArray<float >(2 , Allocator.TempJob); NativeArray<float > b = new NativeArray<float >(2 , Allocator.TempJob); NativeArray<float > result = new NativeArray<float >(2 , Allocator.TempJob); a[0 ] = 1.1 ; b[0 ] = 2.2 ; a[1 ] = 3.3 ; b[1 ] = 4.4 ; MyParallelJob jobData = new MyParallelJob(); jobData.a = a; jobData.b = b; jobData.result = result; JobHandle handle = jobData.Schedule(result.Length, 1 ); handle.Complete(); a.Dispose(); b.Dispose(); result.Dispose();
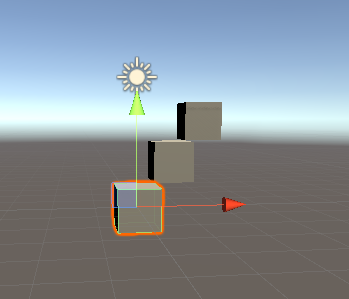
ParallelForTransform 作业是另一种 ParallelFor 作业;专为操作变换组件而设计。(好好用。。可以快速的实现大量物体的坐标变化)) 的位置。
1 2 3 4 5 6 7 8 9 10 11 12 13 14 15 16 17 18 19 20 21 22 23 24 25 26 27 28 29 30 31 32 33 34 35 36 37 38 39 40 41 42 43 44 45 46 47 48 using System.Collections;using System.Collections.Generic;using UnityEngine;using UnityEngine.Jobs;using Unity.Jobs;using Unity.Collections;public class Script_04_20 : MonoBehaviour { public Transform[] trans; private void OnGUI ( if (GUILayout.Button("开始调整位置" )) { NativeArray<Vector3> position = new NativeArray<Vector3>(trans.Length,Allocator.Persistent); for (int i = 0 ; i < position.Length; ++i) { position[i] = Vector3.one * i; } TransformAccessArray transArray = new TransformAccessArray(trans); MyJob myJob = new MyJob { arry = position }; JobHandle hj = myJob.Schedule(transArray); hj.Complete(); transArray.Dispose(); position.Dispose(); } } public struct MyJob : IJobParallelForTransform { [ReadOnly ]public NativeArray<Vector3> arry; public void Execute (int index, TransformAccess transform transform.position = arry[index]; } } }
Profiler Window > Analysis > Profiler 可以访问 Profiler 窗口,详情参见 性能分析器概述